1: Introduction to Word Processing Software
| Site: | Plateforme des ressources pédagogiques et d'enseignement à distance, Université de Biskra. |
| Cours: | ICT and E-Learning |
| Livre: | 1: Introduction to Word Processing Software |
| Imprimé par: | Visiteur anonyme |
| Date: | dimanche 22 février 2026, 20:30 |
Description

1. Introduction
Word processing is an application program that allows you to create letters, reports, newsletters, tables, form letters, brochures, and Web pages. Using this application program you can add pictures, tables, and charts to your documents. You can also check spelling and grammar.
2. Microsoft Word
Microsoft Word allows users to accomplish the following tasks.
- Type and edit text.
- Copy and move text from one location to another in the document, or to other documents.
- Format text and paragraphs with fonts, colors, pictures, tables, and many other tools.
- Design pages for specific purposes- from personal letters to sophisticated memos and reports.
- Enhance documents for readability with pictures, charts, graphics, etc.
- Use mail merge features to quickly and easily send customized communications to customers.
- Share documents securely to others.
- Communicate clearly and professionally with others by using the built-in tools of Word.
2.1. Features of a Word Processor

- Title bar: displays the name of the document and the name of the program. Until you give a new document a different name, its temporary name is Document 1. The left side of the title bar contains the Quick Access toolbar, which includes buttons for saving a document and undoing, redoing, and repeating a change. The right side of the title bar contains the Ribbon Display Options button, which you use to hide or show the Ribbon and tabs, the resizing buttons, and the program Close button.
- The File Tab provides access to Backstage view where you manage files and the information about them.
- The Ribbon contains the Word tabs. Each tab on the Ribbon includes buttons for commands related to editing and formatting documents. The commands are organized in groups. For example, the Home tab includes the Clipboard, Font, Paragraph, Styles, and Editing Groups. The Ribbon also contains the “Tell me what you want to do” box, which you can use to find a command or access help. The ribbon also contains the share command, which you can use to easily share documents.
- The document window displays the current document. This is the space you are working inside.
- The rulers only appear in the Print Layout view. The horizontal ruler displays left and right document margins as well as the tab settings and paragraph indents, if any, for the paragraph. The vertical ruler displays the top and bottom button margins.
- The vertical and horizontal scroll bars are used to navigate inside your document. They contain arrows to help you navigate the document.
- The status bar displays the page number of the current page and the total number of pages and words in the document. It also displays spelling and grammar checking.
- The view buttons on the status bar allow you to adjust the view, toggling between print layout, read mode, or web layout view. The Zoom slider allows you to zoom in and out of the document.
2.2. Saving an MS Word Document File
- Saving is the process of storing a document in a certain location or creating a file. This can be done on a newly created document or on an already existing document. Saving is normally in two categories; Save and Save As.
- When saving for the very first time, Save and Save As behave the same way. They both prompt for file name and location. Click on the Office button>Save As>Type File Name>Choose Location>Save
- Otherwise, Save and Save As behave differently on an existing document.
This is a command used when saving changes made on an existing document without changing the file name and location.
Save As
This is a command used when making a copy of the file in a different folder or making a copy with a different name.
Click on the Office button>Save As>Type File Name>Choose Location>Save
2.3. Formatting Text using the Mini-toolbar and Ribbon
Selected text can be manipulated by using the mini-toolbar or ribbon. The mini-toolbar is displayed when you “right-click” on the selected text. “Right-clicking” in Microsoft Word provides the user with quick actions like “Copy”, “Cut”, “Paste”, Changing the Font, Paragraph Settings, Synonym Tools, and many other quick actions.
The most common and powerful methods available to users is the Ribbon in Microsoft Word.

Here is an overview of each of the tabs.
- File: Access Backstage view, where you can work with your document as a whole.
- Home: Perform basic formatting and editing tasks.
- Insert: Add other elements to your document, such as charts, pictures, videos, cover pages, headers, and footers.
- Design: Change the appearance of your document.
- Layout: Change the setup of your document and its elements.
- References: Manage document resources, such as the table of contents and index.
- Mailings: Create a mail merge document.
- Review: Perform research and review the document.
- View: View the document and/or open Word windows in different ways.
Remember that Word 2016 also features contextual tabs. These are special tabs that only appear when you are working with a specific object or group of information.
Hide the Ribbon
You can quickly and easily change the ribbon display by clicking the arrow icon in the top right-hand corner of the Microsoft Word screen:

Each option provides a description of what it will do, and will remain in effect until you choose a different option.
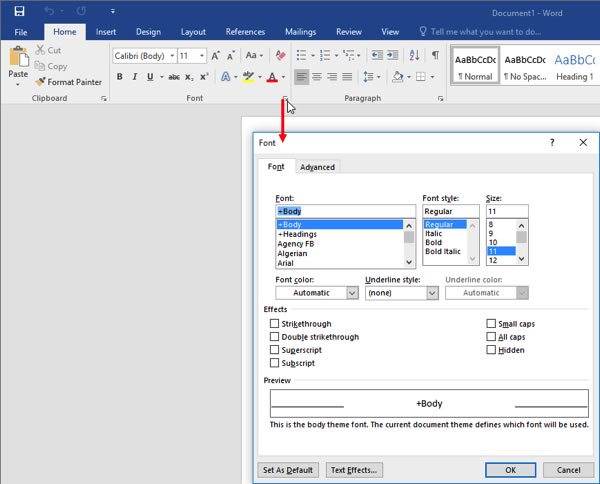
Dialog Box Launchers
Some groups feature an option button beside the group name. Click this button to open a dialog box or task pane with more specific controls relating to this group and other commands in the tab:
ScreenTips
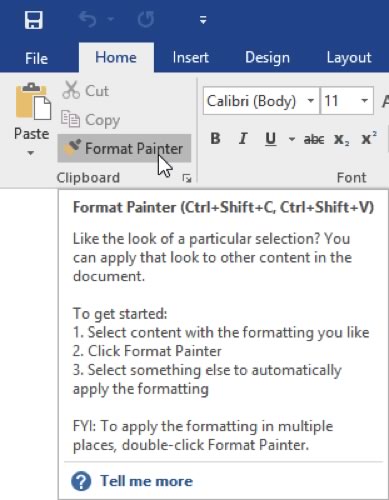
You can hover your mouse pointer over a command to see the command name. Many commands also include a short description and sometimes a keyboard shortcut. This pop-up is called a ScreenTip:
2.4. Exploring the Home and View Tab of Microsoft Word
The Home Tab contains the most commonly used document controls; actions in the Home Tab can change the font and size of the text, paragraph, and line spacing, copy and paste, change the organizational structure of the document.

The Home Tab is grouped into four distinct areas: Clipboard, Font, Paragraph, and Styles.
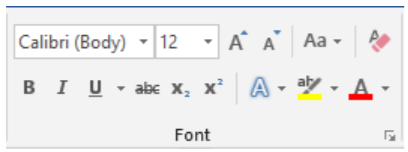
1. The Font group:
The Font group: provides unlimited customization of text. It allows users to change the font or style of the text, the size of the text, provide text emphasis, and even change the colors.
2. The Paragraph Group
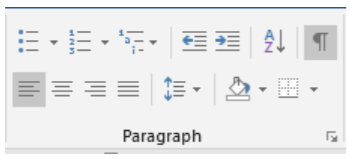
The Paragraph Group focuses on arranging text in a paragraph. Users may create lists, adjust the indentation, sort items, show paragraph formatting, correctly, align text in a paragraph, adjust line spacing, add fill color in shapes, and create borders.
Bullet Lists
Starting in the upper left corner are bullet lists  . Bullet lists should be used when creating a list of similar items that do not require any order. Clicking on the drop-down arrow allows for customization of the appearance of bullet lists. Pressing “Tab” on the keyboard will indent a list item and create a sub bulleted item.
Numbered Lists
To the right of Bullet, Lists are numbered lists  . Numbered lists are like bullet lists, but they should be used when listing out a sequence of events that must be followed in order. Clicking on the drop-down arrow will allow for customization of the numbered list. Pressing “Tab” on the keyboard will indent a list item and create a sub numeral.
Multi-Level Lists
To the left of Numbered Lists are Multi-Level Lists  . Multi-Level Lists provide more customization of lists and sub-lists to the user.
Increase/Decrease
Indent Next on the right, the increase/decrease indent icons  allow the user to move the selected text to the right or left five spaces, or to the next tab setting. Increase/Decrease indent also changes the hierarchy of the list. Increasing an indent to the right will make an item a sub-bullet or sub-number of the item above it and decreasing indent to the left will do the opposite.
Sort
After an increase/decrease indent is the Sort icon  allows the user to arrange a current selection of text in alphabetical or numerical order. It is usually used when working with tables in Microsoft Word.
Show/Hide Paragraph Formatting
Finally, in the top right corner of the paragraph group is the Show/Hide Paragraph Formatting icon  allows the user to view all the hidden formatting options that are currently attributed to the document. This is useful if the formatting seems incorrect in a document and the user is trying to investigate it. Any formatting displayed is not printed.
Paragraph Alignment
The bottom row of the paragraph group begins with Paragraph Alignment settings  . The settings align the selected text to the left side of the screen (which is standard formatting), centered (which is common for titles), right-aligned, and justified, which distributes text evenly between the margins. Most word documents are written with left alignment, so that is the default settings.
Line & Paragraph Spacing
To the right of the paragraph alignment icons is Line & Paragraph Spacing  . These settings allow the user to choose how much space exists between lines and between paragraphs. This is helpful to enhance the readability of paragraphs by creating enough space between sentences and paragraphs. For more customization, users can click on “Line Spacing Options” in the drop-down menu for even greater controls.
Shading
The Shading function  to the right of Line & Paragraph Spacing allows the user to change the color behind a paragraph, table, or selected text. It can be used in flyers and more creative word documents.
Borders
The Page Borders icon  allows the user to create borders around selected text and/or paragraphs and define the type of borders from the drop-down menu. There is every type of border imaginable for the user. Borders are usually created to create distance or space between separate ideas or paragraphs.
More settings
Users who desire more control in paragraph formatting can click on the arrow icon facing down and to the right.  . This will launch a more settings menu that will provide customization of the line & paragraph spacing and page breaks.
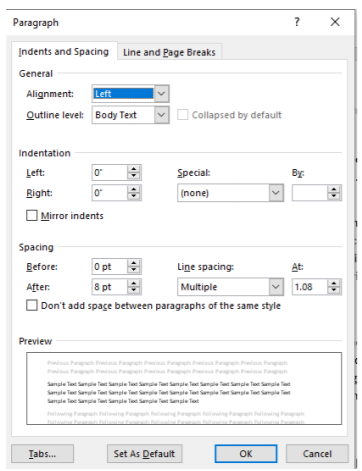
3. View Tab

Microsoft Word provides a variety of options to view their document for the user to customize their workspace. Read Mode allows the document to be viewed without any editing tools available in Fullscreen mode. Print Layout simulates what the document would look like if the document were printed. It is the default view mode in Microsoft Word. Web Layout simulates the view of the document if it were on a web. Outline mode is for a way to quickly insert ideas on the page, while Draft allows the user to just see the text in the document.
Learning Tools allows the document viewer to customize the way the document is presented and read to them. It allows the user how text and pictures are displayed. Users can also determine whether to display the Ruler on the top and left sides of the workspace, gridlines on the document to make it appear like graph paper, and the navigation pane on the left-hand side of the document. The user can also Zoom in or out, and have the document automatically be adjusted to the display size of one page or multiple pages. Users can even open a new window of the document to work in two different places at the same time, or split the document at the insertion point to work in multiple sections at the same time in the document. Finally, Word users can click on the Switch Windows icon on the screen to switch between open word documents, and Record Macros, which allow the user to create their shortcuts by recording actions on the screen and creating a shortcut to perform everything they previously did. When they need to replicate that task, they can enter shortcut and the Macro would be initiated. Macros are for advanced users and not covered in detail in this text.
2.5. The Insert Tables
Adding a table
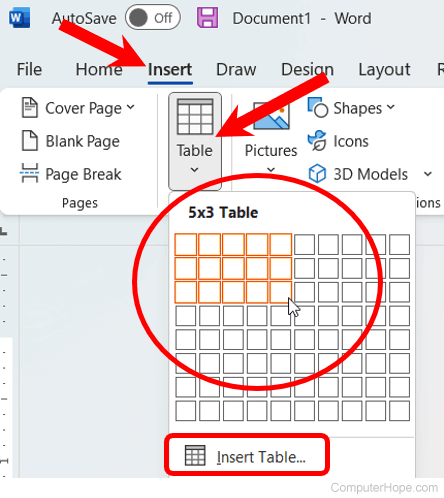
- In Microsoft Word, place the mouse cursor where you want to add the table.
- Click the Insert tab in the Ribbon.
- Click the Table button and select how many cells, rows, and columns you want the table to display. You can also click Insert Table and enter the number of columns and rows for the inserted table.
Inserting or deleting a row or column
In a Microsoft Word table, you can add or remove a row or column at any time.
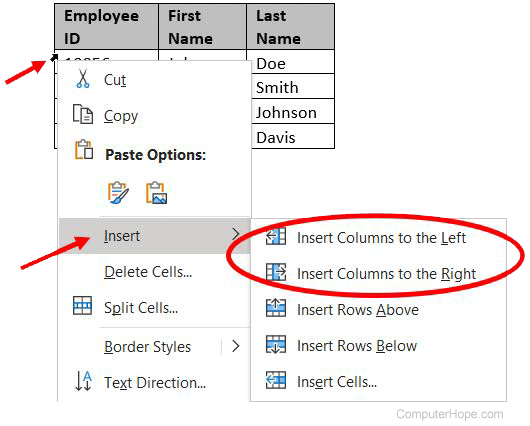
- Move the mouse cursor inside the left edge of a cell in the column where you want to insert a new column. The cursor changes to a small black arrow pointing to the top-right.
- Using your mouse, right-click to open the pop-up menu, select Insert, then select Insert Columns to the Left or Insert Columns to the Right, depending on where you want the row inserted.
Delete a row or column
In the Microsoft Word desktop application , follow the steps below to delete a row or column.
Delete a row
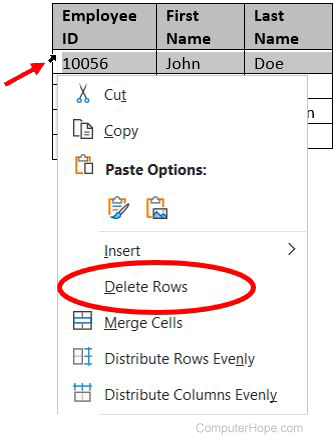
- Move the mouse cursor inside the left edge of a cell in the row you want to delete. The cursor changes to a small black arrow pointing to the top-right.
- Using your mouse, double-click to select the entire row in the table.
- Right-click with the mouse to open the pop-up menu, and select Delete Rows.
Delete a column
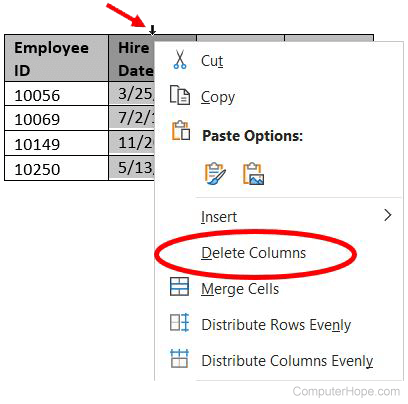
- Move the mouse cursor inside the top edge of the topmost cell in the column you want to delete. The cursor changes to a small black arrow pointing downward.
- Using your mouse, click once to select the entire column in the table.
- Right-click with the mouse to open the pop-up menu, and select Delete Columns.
Moving the table
After the table is added to the document, it can be moved anywhere else in the document. To move the table, hover your mouse cursor over the table, then click-and-drag the arrows in the top-left corner of the table.
Resizing the table
- Move the mouse cursor to the bottom-right corner of the table until the cursor changes to a double-headed arrow.
- Click-and-drag the table in the direction you want the table to expand or shrink.
Changing the look of the table
- After adding the table, move your cursor to a cell in the table, and click the Design tab in the Ribbon.
- In the Design tab, you can adjust the Header Row, Total Row, and how the rows appear. You can also adjust the table's overall look by clicking one of the table styles.
Repeat header row of the table on each page
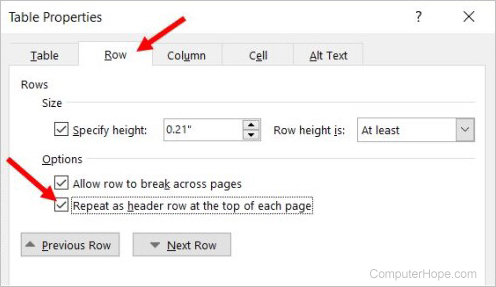
If the table spans more than one page, you may want to have the table header row displayed on each additional page the table spans across. You can make the header row visible on each page by following the steps below.
- Right-click the header row of the table and select Properties in the pop-up menu.
- In the Table Properties window, click the Row tab.
- Check the box for the Repeat as header row at the top of each page option, and click OK.
Deleting a table
- Move your mouse cursor over the table you want to delete.
- At the upper-left corner of the table, a small square with the move icon
 inside it is displayed. Move your mouse cursor over that icon and click it to select the entire table.
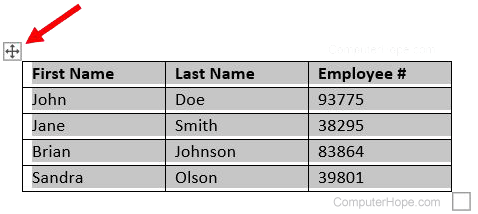
- Right-click anywhere in the table and select Delete Table in the pop-up menu.
